

Key Takeaways
-
Carpet seam peaking occurs when two carpet edges come together and seem “peaked” or raised as a result of tension, alignment, fiber direction, or lighting. Anticipate some exposure and account for it.
-
Make sure your subfloor is clean, dry, and level before you install. Test with a scrap piece to avoid future seam issues.
-
To minimize the visibility of seams, use proper seaming materials and techniques, match dye lots and pile direction, and employ qualified installers.
-
Shield seams from environmental stressors. Keep seams out of direct sunlight, maintain a reasonable room climate, and don’t put the seams in high-traffic areas.
-
Care for seams through consistent vacuuming, careful furniture rearranging, minimal moisture exposure, and occasional professional inspection or touch ups.
-
Manage your expectations with some styles of carpet and demand installer references, photos, and a pre-install list to avoid disappointment.
Carpet seams showing after installation refer to the visible lines that appear where two pieces of carpet are joined together. They arise when seams are improperly cut, joined, or concealed and can manifest as gaps, ridges, or color variations.
Typical culprits are shoddy seaming, inappropriate seam tape, uneven backing or a stretching problem. Homeowners can consider seam type, location, and installer method to determine repair or reinstallation options in the comprehensive guide below.
Understanding Seam Peaking
Seam peaking is the raised line where two pieces of carpet come together post-installation. It presents as a ridge or light-reflective line along the seam and can be faint or pronounced based on a few variables. This is a common and vexing issue for homeowners and professionals because a freshly laid floor that looked great will be marred by lines once the room is inhabited and natural light shifts.
Seam peaking often begins with tension. When installers stretch carpet to fit a room, uneven tension across a seam will cause fibers and backing to ‘peak’ along the join. If the carpet isn’t pre-stretched equally—say, 40 to 45 centimeters (16 to 18 inches) on either side of the seam—stress focuses at the seam and that creates a peak.
If you cut and seam improperly, you’ll create pressure points where the two edges won’t lie flat. Over time, however, these forces can cause seams to become more pronounced instead of settling.
Carpet fiber direction and pile type have a heavy impact on seam peaking. Cut pile or plush carpets conceal seams most effectively as their soft, evenly distributed tufts mask a seam. Berber and patterned carpets display seams the worst.
Berber’s tight loop and dense weave prevent blending at the join, so a seam can leap out across the entire room. Patterned carpets can expose pile direction or pattern repeat mismatches, which can make seams visible even away from windows or direct light.
Seam peaking is heightened by lighting and sunlight. Side light from windows or low-angle artificial light throws a shadow on any little rise, transforming a small bump into a distinct crease. Direct sunlight can accentuate pile direction variations by reflecting differently on each side of the seam.
Room use and foot traffic matter: initial settling commonly takes three to six weeks after installation as fibers relax and backing compresses, so seams may lessen in that period. If a seam gets worse after that window, it probably represents a mechanical or installation concern instead of short-lived settling.
Some carpet constructions and hard backings add to the hazard. Because it doesn’t compress, carpet with stiff backing keeps that misalignment raised. Pattern and Berber constructions cause seams to peak in all areas, not just sunlight or carpet direction, as their tight weave doesn’t leave any spare fibers to hide the joint.
To understand seam peaking is to understand these installation specifics, pile types, and lighting interactions so you can select materials and installation techniques that reduce risk.
Why Seams Show
Carpet seams show for a couple of distinct reasons. Issues extend from the subfloor to the padding to the workmanship. Even costly carpets will show seams when one or more of these conditions exist. Here’s what primarily causes them and what to look for.
1. Subfloor Issues
Not just squeaking, an uneven or unstable subfloor bends and bows the carpet at the join, so seams peak or split. A clean, dry, level subfloor is important before any installation. Lay a scrap piece of carpet over any suspect areas and feel for dips, ridges, or soft spots.
This uncomplicated test frequently exposes what a tape measure overlooks. The reason why seams show is that subfloor issues that go undetected can cause seams to pop and result in expensive repairs.
2. Installation Errors
Bad seaming occurs when seam tape, hot-melt tape or iron heat is applied improperly. If the glue doesn’t completely adhere or the fibers aren’t lined up, seams can grin, peak or come open. Improper tension in stretching induces seam line stress and causes seams to show when walked on.
Installers should adhere to step-by-step techniques and employ appropriate equipment such as seam irons, seam tape, stretchers, staple guns and cleats so seams lay flat. Experienced teams minimize risk and are more likely to make seams nearly disappear.
3. Material Mismatch
Matching dye lots, pile height, fiber twist and backing matter more than most homeowners realize. A little color shift between dye lots lines down the middle. Berber and patterned carpets, due to their tight weave and looped construction, are more likely to show seams than others.
Seams can pop out at you regardless of the lighting or angle. Cut-pile or plush carpets, typically 40 ounces or more, conceal seams the best. Under certain lighting and wear, gaps or shading from mismatched materials become apparent.
4. Environmental Factors
Temperature swings, humidity and direct sunlight alter the carpet fiber dimensions and color at seams. Seams show because the heat or sun makes the fibers expand or fade and the seam shows. Position seams away from windows or primary light sources when you can and avoid high-traffic routes.
Lighting direction can project shadows that highlight seam lines. Keep an eye on room climate throughout and for a few weeks post-installation as seam peaking can take three to six weeks to settle.
5. Adhesive Failure
When seam tape or adhesive doesn’t take, seams can split or tent. Apply quality glues and adhere to manufacturer instructions for warmth and pressure. Not enough glue allows seams to move and fracture under stress.
Check seams in doorways and traffic areas frequently so initial failures are repaired before they escalate.
The Installer’s Role
It’s the installer who decides if seams remain unseen or become a feature. Their work begins before a single cut is made and ends long after the last vacuum pass. Good layout planning minimizes seams and positions them where traffic, light, and pattern make them less noticeable. Multiple cuts and careful joins are needed for large rooms or irregular shapes so that edges meet with even tension and matched pile direction.
Even seasoned installers can muck things up. A decade at it doesn’t ensure immaculate results. Even a veteran installer who hurries, takes shortcuts, or cheapens his tools will still leave seams.
Installers need to select and implement the correct seaming method for the carpet variety. Berber and patterned carpets expose joins easier than cut pile or plush, so it is the technique that counts. Here is a quick comparison of typical seaming methods and their effectiveness at making seams disappear.
|
Seaming Technique |
Best for Carpet Types |
Effectiveness at Hiding Seams |
Notes |
|---|---|---|---|
|
Hot-melt tape with iron |
Cut pile, plush |
High |
Quick bond, low profile if tape aligned under yarn. |
|
Cold-water seaming (seam adhesive) |
All types, patterns |
High for pattern match |
Strong bond; needs correct adhesive and clamping. |
|
Sewn seams |
Heavy commercial |
Moderate |
Durable, but thread may show on fine carpets. |
|
Tongue-and-groove (mechanical) |
Some modular tiles |
Low for broadloom |
Visible join in many cases; used for tiles. |
|
Edge-glued butt seam |
Loop/berber |
Low |
Prone to raveling unless reinforced and sealed. |
This is where proper use of adhesives comes into play to prevent seam delamination and face yarn loss. Lay down a continuous one-eighth inch bead of seam adhesive at the base of the first edge where the face yarn penetrates the backing to prevent fraying and raveling. If the seams aren’t sealed or sealed poorly, they can lose yarn and look ragged in no time.
If seams are out of alignment or not properly sealed, installers have to reseam or fix them, not cover up the problem. Fixes might require re-cutting edges, re-tensioning runs, or replacing the tape or glue.
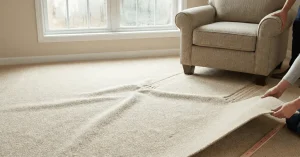
Attention to the full process matters: accurate measurement, careful cutting, correct seaming method, proper adhesive bead, pressure application while the seam cures, and final trimming and vacuuming. Little things—pile direction, light angle, room layout—determine whether seams will show.
Installers should educate customers about care: regular cleaning, avoiding harsh shampoos, and prompt spot treatment help seams age well.
Prevention Before Installation
Preventing carpet seams from showing begins before any material is unrolled. Inspect the installer’s past work by requesting clear photos of previous jobs and references you can contact. Photos should show seams in rooms similar in size and light to yours. Ask for close-up shots and wide-angle views so you can judge seam alignment and how the installer handled pattern matching.
Speak with references about seam longevity and whether any seams became visible after settling.
Prevention before installation involves reviewing a step guide or checklist with installers to ensure every needed action is accounted for before laying carpet. It should discuss subfloor inspection, seam placement, stretching versus adhesive, and post-installation steps.
Determine together in which direction the pile is going to run, how seams should be butt-joined or hot-glued, and what edge finishing will be employed at doorways. Find out if the installer intends to utilize power stretchers and seaming tape rated for your carpet.
Use this checklist to cover key details before installation:
-
Subfloor evaluation: check for flatness, moisture, and loose boards. Get it to come up with corrections and record required leveling materials in millimeters.
-
Room measurement and seam plan: Map out seam locations on a scaled sketch. Deny seams across high visibility lines and center of screens.
-
Lighting review: Inspect natural and artificial light angles to find where seams might show. Photograph any possible seam lines in both day and evening light.
-
Carpet type and direction: Note if carpet is Berber or patterned, which is more likely to show seams, versus cut pile or plush of 40 ounces or more, which is less likely to show seams.
-
Traffic and furniture placement: Plan seams for low-traffic zones or beneath fixed furniture that will not be moved.
-
Material handling: Confirm installation of seaming tape suited to pile and adhesive compatible with underlay.
-
Equipment and technique: List tools to be used, including power stretcher, seam iron, and seam roller. Specify hot melt versus adhesive method.
-
Settling and follow-up: Record the expectation that seams can take three to six weeks to settle and schedule a follow-up inspection.
Arrange a home estimate so the installer can inspect the subfloor condition, size of room, lighting, and seam placement possibilities firsthand. During the visit, indicate to them where furniture will be sitting and where you want seams concealed.
For rooms around 3.5 metres (11’6″) or smaller, debate whether you need a seam at all. Request the estimator to provide seam mockups or temporarily mark seam lines on the floor so you can visualize results and select the least conspicuous seam route.
The Unspoken Truth
We’ll admit it — even with our talented installers and premium carpet, some seams will be visible is a harsh reality. Carpets contain thousands of individual yarns and face fibers that need to be seamed together. A seam where two pieces meet or the direction, density, or tension of the pile changes can form a line that reflects light differently. This is particularly the case in the first few weeks post-installation when fibers are still settling and glue is curing.
Anticipate some seam definition up front. In most instances, it will mellow over a few weeks as the carpet comes to rest and foot traffic evens out the pile.
Some carpet constructions reveal seams easier. Berber and looped styles, along with carpets that have twisted or textured fibers, emphasize joins because their surface isn’t level. Patterned carpets expose seams where pattern repeat and pile direction must be matched. Even a slight mismatch will be noticeable.
Cut-pile and plush carpets conceal seams best because their high density and level surface mask joins. If concealing seams is a priority, opt for a dense, low-sheen cut pile and talk seaming with your installer.
Installation quality is a big deal. Proper seam joining is all about tight edge trimming, correct seam tape or adhesive, and consistent pressure during seaming. Rookie installers leave gaps, do not use enough adhesive, do not stretch the carpet properly, leaving visible lines, seam peaking, or delamination.
Unsealed seams or bad glue can permit tufted carpets to delaminate or shed face yarns, forming ragged or balding lines. Demand installers who employ industry-standard seam tape, evenly applied glue, and heat seal or weight seams as per manufacturer’s recommendation.
Upkeep and timely repair minimize the lasting effects of palpable seams. Seams tend to settle with time. Brushing the pile across the seam, vacuuming on a regular basis, and using recommended cleaners keep the pile aligned.
If a seam peeks, re-tacking and re-gluing can lay it flat. For the more serious issues like delamination or “Off Tenter” manufacturing defects, get pictures of what is happening and contact the retailer or manufacturer to get it repaired or replaced under warranty.
Have sensible expectations about how pristine a big carpeted field can remain and design regular inspections in the initial months. A gratifying flooring result mixes pragmatic expectations with educated product selection, professional installation, and maintenance.
Long-Term Care
Long term care here connects to this consistent maintenance and the hands-on methods that homes and care environments maintain carpet seams so floors remain secure and tidy over a span of years. Whether this is at home, assisted living, a nursing home, or wherever folks require assistance with daily tasks and the floors receive consistent traffic, it minimizes trips, minimizes damage, and keeps glue and seam tape in place.
Vacuum a few times a week and don’t drag heavy furniture over seams. Daily or weekly vacuuming picks up grit that abrades fibers and creates stress at the seam line. Vacuum with height control and soft-bristle attachments for loop or cut-pile carpets. Lift furniture pieces or use sliders when moving them to relieve stress on seams. Repetitive scraping will loosen seam tape and split adhesive bonds.
These measures assist households where inhabitants require assistance mobilizing, as frayed hems can serve as a tripping risk for those in need of support. Stop moisture and be clean. Water and steam clean can be effective, but too much of either will cause seam adhesives to lose strength and seam tape to peel. Clean spills on the spot using a damp cloth and a mild detergent with as little water as possible, blotting instead of rubbing.
For deep cleaning, opt for professional hot-water extraction with controlled moisture or low-moisture encapsulation. In care facilities and homes handling chronic illness or disability, adhere to a rigorous schedule so cleaning doesn’t undermine seam integrity or interfere with daily care. Arrange for inspections and touch-ups from flooring pros every few years.
Get a flooring pro to inspect high-traffic seams every 6 to 12 months, or more frequently in facilities with intensive care needs. Pros can reseam, re-stretch, or re-adhere and reseam tape before issues expand. This matters when long-term care needs are uncertain. Early interventions avoid sudden safety problems and costly overhauls down the road.
Maintenance tips for preserving carpet seams:
-
Vacuum high-traffic areas two to three times a week and less frequently in rooms that are used every week.
-
Use furniture pads and pick up heavy items when moving rooms.
-
Blot spills immediately; avoid saturating seams with water.
-
Trap dirt and reduce edge wear through entry mats.
-
Schedule professional inspection every 6–12 months.
-
Keep indoor humidity 30–50% to protect adhesives.
-
Replace damaged seam tape promptly to prevent spread.
Long-term care can be expensive and complicated. Factoring carpet care into routine budgets and care plans guards both safety and investment longer term.
Conclusion
Flat or visible carpet seams indicate fit, glue, or wear problems. Small gaps or raised edges typically result from tight rolls, low seam weight, or inferior seam tape. Skilled fit and quality materials reduce the likelihood of seams showing. With routine vacuuming, furniture rotation, and flat seams, these seams will continue to lay low with time. If seams rise a few weeks later, have your installer check seam glue, tape, and stretch. For older seams, a trusted pro can re-tack or replace the strip and re-press the join. When you reach out to them, take along clear pictures and a concise timeline. Need assistance in writing your installer a note or picking a fix option? I can do that for you.
Frequently Asked Questions
Why are my carpet seams showing after installation?
Seams are visible typically because the edges weren’t cut and joined or stretched properly. Seams can open due to temperature changes or inferior adhesive. Have a professional installer look at the join to check for proper seaming method and seam sealer.
Can seam peaking be fixed without replacing the carpet?
Yes. Most are repairable by re-stretching and/or re-seaming or seam sealer. Repairs vary based on carpet type and damage. A good professional can typically conceal or minimize the peak without replacement.
How soon should I contact the installer about visible seams?
Call the installer right away or while you’re still under warranty period. The sooner you discover a problem, the greater the likelihood it can be repaired and your warranty rights protected. Immediate action stops the damage from increasing.
Does carpet quality affect seam visibility?
Yes. Quality matters. The higher quality the carpet, with denser pile and superior backing, the less seams will show. Lower quality or loosely woven carpets are more susceptible to seam peaking. Risk it less with quality materials.
Will humidity or temperature changes cause seams to show later?
Yes. Carpet seams may become more apparent after installation due to seasonal humidity and temperature changes that cause the carpet to stretch or shrink. Good seam sealing and sufficient acclimation prior to installation minimize this risk.
How can I prevent seams from showing before installation?
Get good installers, request hot-weld or sewn seams on sensitive areas, and have the carpet acclimate to room conditions. Employ appropriate seam tape, sealer, and stretcher tools.
What should I expect a professional repair to cost?
Prices depend on where and how difficult the repair is. A simple re-stretching or re-seaming is normally less expensive than partial replacement. Obtain written quotes from trustworthy installers and review the warranty coverage.