

Key Takeaways
-
Understand that split level homes have staggered floors and short stair runs that necessitate intentional transition planning to prevent visual breaks and tripping hazards. Employ matching materials or transition strips to preserve flow.
-
Account for structural and subfloor variations such as concrete, plywood, or uneven surfaces and evaluate moisture risk before selecting materials. Prepare with underlayment or leveling compounds as needed.
-
Identify your floor types by zone depending on durability and moisture tolerance. Use hardwood or engineered wood throughout your primary living spaces. Use luxury vinyl or tile in entryways and lower levels. Use carpet or cork in bedrooms and stairs.
-
To maintain cohesion, try to keep the same tones and textures, or even the same flooring, throughout your main circulation areas and stairs. Place transitions at natural breaks such as doorways or landings for a finished appearance.
-
Customize lighting, paint color, and stair finishes to balance flooring selections so darker or lower rooms feel lighter and architectural transitions appear purposeful.
-
Establish a solid budget upfront with the assumption you will splurge on the high-traffic, highly visible areas and use trickle-down finishes for the remainder. Include installation and subfloor prep fees before you commit.
Split level flooring ideas that really tie staggered rooms into one cohesive space. Selections such as wide-plank hardwood, sturdy engineered wood and thin-profile tile establish visual continuity across small stair runs and landings.
Coordinating color and finish maintain sight lines open while area rugs delineate zones. Think about acoustic underlayment for noise control and slip-resistant surfaces by entrances.
This guide addresses material, layout, and budget options to suit different split-level plans.
The Split-Level Challenge
Split-level homes are a stagger of floor planes with short stair runs between tight zones, which makes flooring decisions more complicated than single-level plans. Floors should connect varying heights and purposes without making jarring aesthetic interruptions. Materials need to withstand entryway and family room traffic, yet nestle into cozy bedrooms and lower-level dens.
You have to think about material, color, and where one floor meets another in order to get a consistent look across all the different room sizes, ceiling heights, and partial walls.
Structural Nuances
Split-level architecture often introduces rooms with varying ceiling heights and floor footprints, and this influences how a floor reads from space to space. A low-ceilinged lower level can seem even smaller if the pattern of the floor is too frenetic, while a soaring open living area calls for a grain or plank width that complements its scale.
Half walls and open staircases provide a visual barrier that a change of floor might make sense, but they call for tidy edge details to appear finished. Room size varies widely and you may want wider planks in bigger rooms and narrower boards in small spaces for scale.
Open staircases and floating treads compel you to think about how planks end at risers and landings. In your plans, identify where partition walls and short runs will break up patterns. Occasionally extending the same run through sightlines provides a feeling of continuity even when levels change in height.
-
Common structural features that affect flooring installation:
-
Half walls and knee walls.
-
Short stair runs with little landings.
-
Open risers and floating stairs.
-
Different ceiling heights from floor to floor.
-
Varied room sizes with tight connectors.
-
Subfloor Variations
Different levels of the same house often sit on different subfloor types: plywood over joists upstairs, concrete slab on lower levels, or older board subfloors in mid-century builds. Each level requires individual prep and can restrict options.
Engineered hardwood can be installed over plywood and certain concrete substrates with appropriate moisture barriers, whereas solid hardwood often necessitates plywood or sleeper systems. Basements and other floors in direct contact with ground typically need to be tested for moisture and a vapor barrier added prior to laying down wood or resilient floors.
Ragged or sagging subfloors require leveling compounds, sistering joists, or plywood foundations to achieve a flat platform. Underlayment provides sound protection between floors and can even cover minor unevenness.
|
Subfloor Type |
Recommended Flooring |
Prep Required |
|---|---|---|
|
Plywood/OSB |
Engineered hardwood, laminate, carpet |
Minimal; check flatness |
|
Concrete slab |
Vinyl plank (LVT), tile, engineered wood with barrier |
Moisture test, vapor barrier |
|
Old hardwood/boards |
Refinish or install plywood + new floor |
Repair, level, secure |
Level Transitions
Clean transitions minimize tripping hazards and maintain visual continuity in your elevation changes. Install transition strips at contact points or varying heights, selecting profiles appropriate to floor thickness and traffic. Seamless materials, like same color family or plank direction switches, aid the eye to shift from zone to zone.
Subtle texture shifts provide interest without destroying harmony. A matte wood to a slightly textured tile works better than stark contrasts. Think of thresholds that ‘split level’ stepping down gently at short runs and small landings.
These can be metal, wood, or composite and must be secured firmly.
-
Popular transition solutions:
-
Flush reducers up to 6 mm.
-
T-molding between same-level floors.
-
Metal stair nosing.
-
Overlap reducers for thick-to-thin transitions.
-
Best Flooring Options
Split level homes require flooring options that strike a balance between flow, durability, and visual cohesion. Factor in traffic patterns, moisture hazards on lower levels, and how materials fit budget and maintenance demands prior to finish specification.
Mix-and-match flooring solutions create a multi-level look.
1. Hardwood
Hardwood is a great choice for primary living areas as it brings warmth and timeless appeal to a room while boosting resale value. Carrying the same wood up stairs and into hallways gives a sense of visual continuity between staggered levels and makes various rooms feel like part of one cohesive layout.
Solid hardwood is susceptible to humidity fluctuations and shouldn’t be applied to basements or moist lower levels. Engineered hardwood has better dimensional stability and conforms to varying subfloors, so it’s the smarter pick where floors join or there is some moisture difference.
2. Luxury Vinyl
Luxury vinyl plank or tile (LVP/LVT) combines durability and water resistance with impressive wood and stone visuals that complement modern and classic décor. It stands up to tough footfalls and is suitable for kitchens, mudrooms, and basement family rooms where messes and moisture are more common.
LVP brushes off subfloor imperfections and installs fast, frequently with floating clicks or glue-down alternatives, meaning it can be applied on several different floors for a cohesive look. In entryways of split levels, select a high-density wear layer and textured surface to fend off scuffs and keep looking new.
3. Laminate
Laminate is an inexpensive choice with lots of wood and tile look-alike styles out there. It maintains the visual cohesion where pocketbooks are thin. It works well in bathroom or laundry rooms because water can damage the core.
It is suitable for living rooms, bedrooms, and hallways. Click-lock systems allow you to run the same product across staggered floors and make future repair easy. The right underlayment minimizes echo and covers up small imperfections in the subfloor. A moisture barrier is smart on lower floors.
4. Carpet
Carpet provides cushioning and sound insulation, perfect for bedrooms, family rooms, and stairs where comfort is key. It evens transitions between levels and significantly reduces airborne noise in active households.
Neutrals or low-contrast patterns continue the space without emphasizing level changes. Carpet is an absolute no-no in entryways or wet sloshing zones. If it has to be in the vicinity of a door, pick a stain-resistant fiber!
5. Tile
Tile is perfect for entryways, kitchens, and bathrooms as it resists water, dirt, and heavy use and is easy to clean. Available in various sizes and formats, it can zone an area with varying sizes or patterns.
Subfloor prep is key to prevent tiles from cracking as levels shift. Cement board or decoupling membranes assist. With matching grout colors and tile sizes, you can connect neighboring rooms and strengthen a cohesive palette.
Creating Cohesion
It’s important to create cohesion in split level homes as the levels are often open to each other, similar to an open plan house. A cohesive flooring plan assists in connecting these areas together so the home flows as one connected floor plan, as opposed to a collection of disconnected rooms. The sub-sections below deconstruct actionable methods to accomplish that visual flow with respect to material selection, transition location, and color choices.
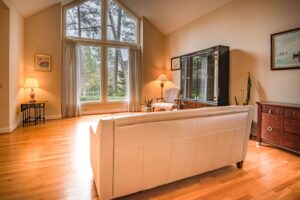
Unified Flooring
Install the same flooring material in main living areas, halls, and stairs to maintain clean, continuous sightlines. It is always best to use a single material because it decreases visual clutter and small level shifts are less obvious, which comes in handy where sightlines intersect between levels.
Large-format planks or tiles stretch the eye and inject a contemporary aesthetic. For example, 180 cm by 30 cm oak-look planks or 60 cm porcelain slabs fare well in open sightlines.
No busy patterns that compete with the room’s architecture. Herringbone or small mosaics can be beautiful within a single room but interrupt the visual flow when viewed from above or on adjacent floors.
Remember a common underlay height to avoid awkward step-ups and correspond with stair nosing so transitions seem deliberate.
Strategic Transitions
Put transitions at natural breaks like doorways, stair landings, or between different ‘activity zones’ this separates spaces without harsh transition. Ornamental inlays, narrow metal lines, walnut slivers, or stone trim add an intentional, fashionable join between two surfaces and assist the eye in embracing a transition.
Pick transition strips that either match or harmonize with each floor. A mid-tone metal strip can successfully bridge warm wood with cool tile. Try to use the same type of strip throughout the house to create cohesion.
Effective transition ideas:
-
flush reducer at stair landings for continuous look
-
wood inlay between tile and plank in entryways
-
metal edge strip in high-traffic thresholds
-
Thin tile border on step risers to mimic floor coloration.
Color Harmony
Choose floor colors that complement walls, cabinetry, and key furniture pieces to maintain harmony. With neutral or toned floorings, your decor can change without having to worry about clashes.
Warm greys, soft beiges, and muted browns work across cultures and styles. Lighter floors illuminate lower or window-poor levels, making them feel taller and more open.
Maintain a cohesive color scheme throughout to encourage cohesion. Echo tiny design accents, such as artwork, a rug hue, or a trim finish, throughout floors to strengthen the link.
Leave small gaps between furnishings and railings or pony walls for visual flow and sightlines!
Level-Specific Choices
Split-level homes are ideal for level-specific floor choices that respond to each level’s function, light, and circulation. About level-specific choices: Make decisions that encourage flow between the house while meeting moisture, traffic, and comfort requirements. Use material, color, and texture to connect levels without making every floor the same.
Entryway
Opt for resilient, water-resistant materials like ceramic or porcelain tile, LVP, or stone in entryways where dirt and moisture make their initial landing. These selections withstand scuffs and salt or grit from the outdoors and mop with ease. If you have a level-specific choice, a bold or patterned tile can be a visual welcome and an overall scheme that you reverberate lightly upstairs.
Match grout color and border trim to neighboring rooms so the foyer comes across as part of one plan, not a random patch. In tight or lower-ceilinged foyers, lighter tones and larger-format tiles minimize visual noise and help in keeping the space feel open.
Main Living
For primary living and dining spaces, go for hardwood, engineered, LVP, or high-quality laminate that prioritizes comfort, acoustics, and resilience. Select a finish and tone that harmonize with the level’s natural light and visual ceiling height. Richer, mid-tone woods pair beautifully with moderate light, whereas pale wide-plank floors infuse compact spaces with luminosity.
Area rugs can help delineate seating and dining areas in open plans and add warmth and texture without requiring a change in base flooring. Maintain finish and plank direction consistent between living, dining, and kitchen areas when possible for flow. If you must change material, use a coordinating transition strip and keep color values close.
Lower Level
Lower levels, basements, and below-grade rooms need moisture-resistant floors: LVP, porcelain tile, or sealed and stained concrete are practical choices. Add some durability and low maintenance for family rooms, laundry, or mudrooms where spills multiply and heavy use abounds.
Make those darker spaces cozy with warmer colors, wood-look textures, or soft surface rugs. Skip solid wood in wet spaces without a strong moisture-control system. Try to schedule your transitions at stair landings and doorways so that these visual breaks correspond with architectural elements, such as stairs, to help eliminate the ‘segmented’ sensation that split levels sometimes generate.
Bedrooms
Bedrooms and upstairs hallways demand softer, quieter flooring — carpet, cork or underlayed engineered wood — for sound control. Select level-specific materials that fit the home’s color scheme and desired mood. Neutral carpets provide serenity, cork offers sustainable warmth, or wood maintains continuity with main living spaces.
Subtle textural or color shifts can individualize kids’ or guest rooms without breaking flow. Smooth thresholds avoid trips and keep noise transfer low between levels.
Beyond The Floor
Split-level homes require design thinking that goes beyond materials underfoot. Lighting, wall color, and staircase design all help to shape how floors read, how spaces feel, and how people transition between levels. Structural constraints, the function of the room, and the sight lines from the floor below all contribute considerations as well.
Hard substances like tile or stone might not be appropriate for second floors without structural reinforcement. Think functional as well as beautiful, so every floor fuels lifestyles.
Lighting Impact
Layered lighting highlights flooring texture and mood. Overhead ambient lights provide fundamental illumination, while recessed or track fixtures highlight the grain in wood or shine on polished concrete. Low, warm accent lights add a warm note to living rooms and brighter task lighting helps kitchens and work spaces.
Add new fixtures to dark stairwells and lower levels. A pendant or wall sconce can make steps safer and more inviting. Natural light combined with light floors can make rooms seem larger.
Position your lights to avoid the deep shadows generated by different ceiling heights. Hit lights where levels intersect and steps throw shadows.
Staircase Integration
Extend your main floor material onto the stairs for a fresh, contemporary run between floors, or install a contrasting runner for texture and traction. Match treads and risers with adjoining rooms so transitions feel intentional, not haphazard.
Decorative railings, a petite feature fireplace, or a tiled accent wall at stairs can highlight the vertical join and convert a necessity into an architectural statement.
Prioritize safety: Stair finishes must be slip-resistant and durable. In places where structure is unknown, lightness-engineered wood or flexible vinyl might be safer than dense stone.
Check subfloor and structural info before laying weighty finishes. Save big money and headaches down the road.
Wall Colors
Choose wall colors that complement flooring undertones and add to the sense of openness. Cooler grays or warm beiges bring out different notes in wood, so play up undertones instead of trying to match exactly.
Lighter paint in lower or smaller rooms helps reflect light and visually expand the space. This is helpful when a 1960’s era house sports deep red tile that could make any room feel dark and closed-in.
Or use accent walls or trim at flooring transitions to define zones without hard breaks. Stay within the same color family through rooms to maintain harmony.
Little shifts in hue demarcate our transitions but maintain a cohesive flow. Entry flooring matters: a well-chosen entry material and a windowed front door or sidelights make a strong first impression and set the tone for the whole house.
Smart Budgeting
Smart budgeting frames what flooring options are realistic across split level homes and how to phase work between levels. Begin with a smart budget that encompasses materials, installation, surface prep, and repair work needed when transitioning from one level to another.
Stick to the rule of thumb to not renovate more than 30% of the home’s current value in total. For full bathrooms, keep floors and fixtures in the 5 to 10% value range.
Keep in mind flooring product prices range anywhere from $2 to $20 per square foot and average installation costs are around $7 per square foot. A 46-square-metre room can cost roughly $3,500 to install. Add a cushion of 10 to 15% for surprises like subfloor repair or moisture mitigation.
Set a clear budget and phase work by level
Map the house in terms of traffic and visibility, then deploy a phased plan. Detail each level with area in square metres and multiply by target material and installation cost for realistic totals.
For example, high-traffic living areas might get engineered hardwood at about $8 to $15 per square metre, while lower-use bedrooms can use vinyl plank at $2 to $6 per square metre. Aim to swap out floors where stairs and landings meet first, as different height or transition costs extra if done at a later date.
Phasing keeps total renovation spend within the 30% guideline.
Compare long-term value and maintenance needs
Think lifetime cost, not just price. Hardwoods have a higher upfront cost but can be sanded and refinished, extending life.
Luxury vinyl plank (LVP) is low maintenance and moisture-resistant, so it is impact-resistant in lower levels and basements. Carpet is inexpensive to lay but could require more frequent replacement in high traffic areas.
When you are comparing cost per square meter over a ten year period, remember to include cleaning, repair, and lifespan. For example, a $20 per square meter tile may last 30 years with low maintenance. A $5 per square meter carpet may need to be replaced every 8 to 10 years.
Prioritize premium finishes in visible areas
Splurge on living rooms, main stair runs, and entryways, where material quality influences perceived value. Be budget savvy in secondary bedrooms, closets, and utility spaces.
Consider mixing materials: durable tile in wet zones, hardwood on main floors, and affordable LVP on lower traffic split level landings. Second-hand or surplus flooring can cut expenses in less conspicuous locations.
|
Flooring Type |
Cost Range (per sq ft) |
Advantages |
|---|---|---|
|
Hardwood/Engineered |
$5–$15 |
Long life, can refinish |
|
Tile |
$3–$20 |
Water resistant, durable |
|
Luxury Vinyl Plank |
$2–$8 |
Affordable, low maintenance |
|
Carpet |
$2–$6 |
Low cost, comfort |
Conclusion
Split-level homes demand savvy but simple floor solutions. Choose a hard-wearing floor such as engineered wood or luxury vinyl in high traffic areas. Something softer and cozier like carpet or cork works well for lower-level bedrooms and family nooks. Match tones and trim to connect rooms. Add a runner or a contrasting tile band at short stair runs to direct sight lines and decelerate visual momentum. Rugs can be used to warm small landings and protect wood on stairs. Coordinate your buys by room to prevent waste and maintain a consistent appearance. Little samples in daylight assist in making the final decision. Prepared to select materials and layouts for your house? Begin a shopping list and jot down sizes for quotes.
Frequently Asked Questions
What flooring works best for split-level stairs and transitions?
Go with something durable and slip-resistant like engineered hardwood, LVP, or tile. Make sure stair nosing and transition strips either match or coordinate for both safety and visual flow reasons.
How do I make different levels feel cohesive?
Use a consistent color palette, echoes of texture, or the same flooring family, such as hardwood and stair treads. Visual continuity connects spaces without sacrificing level character.
Is underfloor heating a good option for split-level homes?
Yes. Electric or hydronic radiant heat does well under tile or engineered flooring. It’s cozy and helps wick temperature differentials between floors.
Can I mix carpet and hard flooring without looking disjointed?
Yes. Put carpet in the bedrooms for warmth and hard floors through the common areas. Pick coordinating colors and install neat transition strips to maintain the thoughtful vibe.
What flooring is best for high-traffic split-level entryways?
Go scratch-resistant, waterproof, such as LVP, porcelain tile, or commercial grade laminate. Incorporate a tough mat and a quick sweep-up ritual to your entryway, and the life of your floor extends.
How much should I budget per square meter for quality flooring?
Expect wide ranges: engineered hardwood costs between €50 and €150 per square meter, LVP costs between €20 and €70 per square meter, and tile costs between €25 and €100 per square meter for materials only. Include installation, underlayment, and transitions for a comprehensive estimate.
How do I handle height differences between levels?
Incorporate a short ramp, step-up with matching risers, or combine a landing with obvious transitions. Check with a contractor to comply with building codes and have safe rise and run measurements.